Setup Was Unable to create A New System Partition – Fix it with 5 Solutions
Deprecated: trim(): Passing null to parameter #1 ($string) of type string is deprecated in /home/caocap/public_html/wp-content/plugins/fixed-toc/frontend/html/class-dom.php on line 98
5 quick solutions for Setup was unable to create a new system partition
Setup was unable to create a new system partition or locate an existing system partition error suggest that Windows can’t identify which device to install operating system. Usually, the error occurs to Windows legacy installation from USB flash drive or USB external hard drive. The essence of fixing the issue is to make Windows recognize where OS should be installed. You can try one of more methods listed as following based on a specific situation:
▶ Solution 1. Remove all peripheral devices and re-insert the USB ▶ Solution 2. Change SATA controller mode to IDE in BIOS ▶ Solution 3. Set the hard drive where you want to install Windows as the first boot device ▶ Solution 4. Create the system partition manually ▶ Solution 5. An ultra-easy way to install Windows on your SSD or HDD
✔ Solution 1. Remove all peripheral devices and re-insert the USB
First of all, you can remove all unnecessary external devices other than the USB drive for Windows installation. Then, you can see whether you can install Windows 7, 8, or 10 successfully. If you still fail to create a new system partition, you can remove the Windows installation USB drive and re-insert it through those steps:
Step 1. Remove USB drive from your computer and exit from the “where do you want to install Windows” window.
Step 2. Then, you’ll be navigated to the main interface of Windows installation. Click “Install Now” and then you’ll be prompted by a message saying that “A required CD/DVD drive device driver is missing…”. Click “OK” on the “Load Driver” window and click “Close” button to return to the main interface again.
Step 3. Plug the Windows Setup USB drive into your PC; click “Install Now” and try to install Windows on your SSD or HDD again.
Note: You can insert the USB in another port to see whether the issue is resolved.
✔ Solution 2. Change SATA controller mode to IDE in BIOS
If solution 1 isn’t working, you can change SATA controller mode in BIOS as incorrect SATA controller mode also can be the reason for “Setup was unable to create a new system partitions or locate an existing system partition”. Detailed steps are given below:
Step 1. Reboot PC and press a functional key (F2, F12, or Esc) to enter BIOS.
Step 2. Go to “Advanced” (“Main” or “Integrated Peripherals”) > “Storage Configuration” (“Drive Configuration” or “IDE Configuration”).
Step 3. Choose “Configure SATA as”; hit “Enter” key; choose “IDE” under “Options” and click “Enter”.
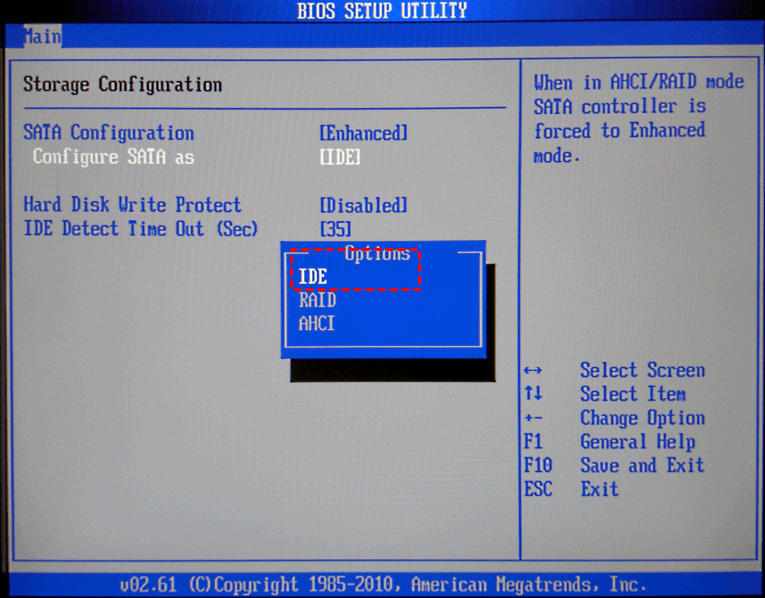
Step 4. Press “Esc” key to go back to the main menu and press F10 to save changes and exit from BIOS.
After that, try to install Windows on your hard drive again.
Note: If the destination disk is SSD, it’s advised to switch mode back to AHCI for better SSD performance.
✔ Solution 3. Set the hard drive where you want to install Windows as the first boot device
You may have set the USB drive as the first boot device before Windows installation, which can cause “Setup was unable to create a new system partition” error. In such a condition, try to set the disk where operating system will be installed as the first boot device in BIOS. Then, boot from the setup USB drive and install Windows again.
✔ Solution 4. Create the system partition manually
Or you can create the system partition manually by copying installation files from your USB drive to your device to which you install OS. Here are the detailed steps:
Step 1. Boot from the setup USB drive, press F10 + Shift to access Command Prompt.
Step 2. In Command Prompt interface, input “diskpart” and hit Enter to run Diskpart.
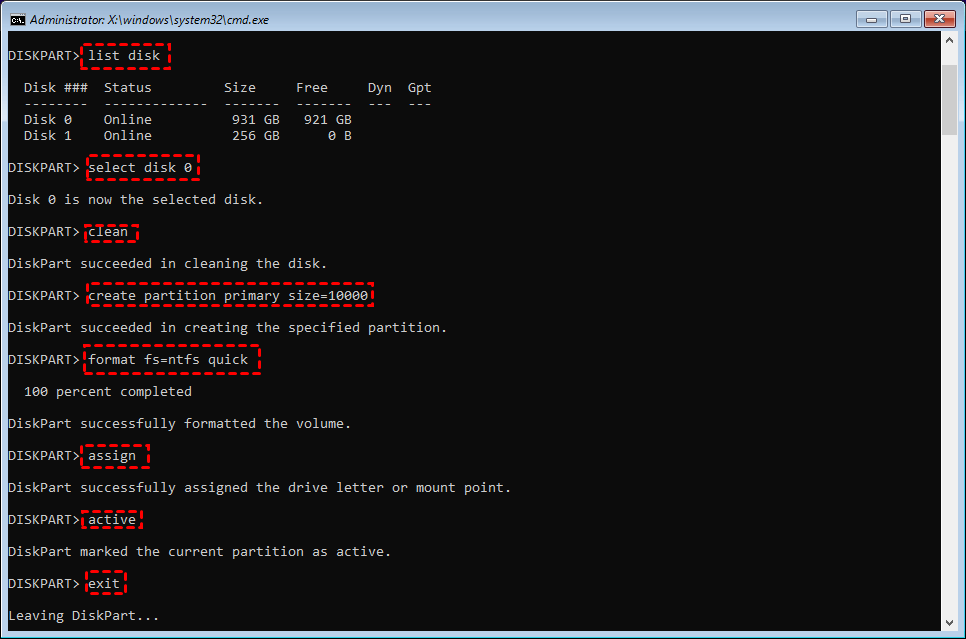
Step 3. Run commands as follows:
-
list disk -show all disks on your PC
-
select disk 0 – choose your target disk
-
clean – all data on disk 0 will be erased.
-
create partition primary size=x – x is the size of the new partition
-
format fs=ntfs quick – the partition will be formatted as NTFS
-
assign – assign drive letter to the partition
-
active -to set the partition as active.
-
exit – to exit from Diskpart
Step 4. Now, go to the setup USB drive by running command “cd: d” d is the drive letter of the USB drive.
Step 5. Type “cd boot” and hit “Enter” key to navigate to boot folder.
Step 6. Input “bootsect /nt60 c:” to make the newly created partition bootable.
Step 7. Remove the USB drive from your PC; restart your computer and enter Windows setup and install Windows step-by-step.
Step 8. After complete Windows installation on your target device, boot computer from it.
Step 9. In the Search box, input “CMD”, right-click it among listed results, and choose “Run as administrator”.
Step 10. In the CMD window, type “list bcdedit” and hit Enter.
Step 11. In the listed content, locate Windows Setup and copy identifier.
Step 12. Input “bcdedit /delete identifier” to run unnecessary menu item from boot screen.
✔ Solution 5. An ultra-easy way to install Windows on your SSD or HDD
In fact, it’s a lit bit complicated to install Windows from scratch. And it’s fairly bothering to encounter issues like “Windows was unable to create new system partition”. When you need to replace your current system hard drive with another one, to install Windows on your new hard drive without any effort, you can turn to AOMEI Partition Assistant Professional. It enables you to clone OS partitions only from old hard drive to new SSD or HDD without reinstalling. What’s more, it supports you to transfer all data from one disk to another. Now, let’s see how to use the software to migrate OS to another drive.
Note: It’s available to download the demo version of AOMEI Partition Assistant Professional and have a try!
Step 1. Install and run the software and click “Migrate OS to SSD”. 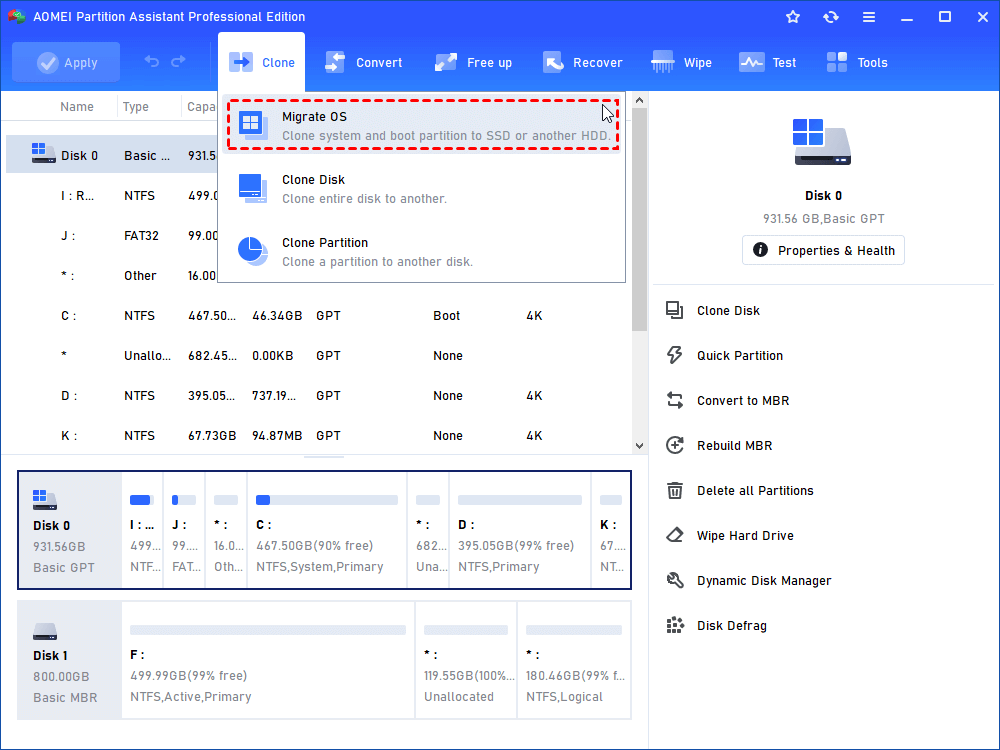
Step 2. Choose an unallocated space on your destination drive.
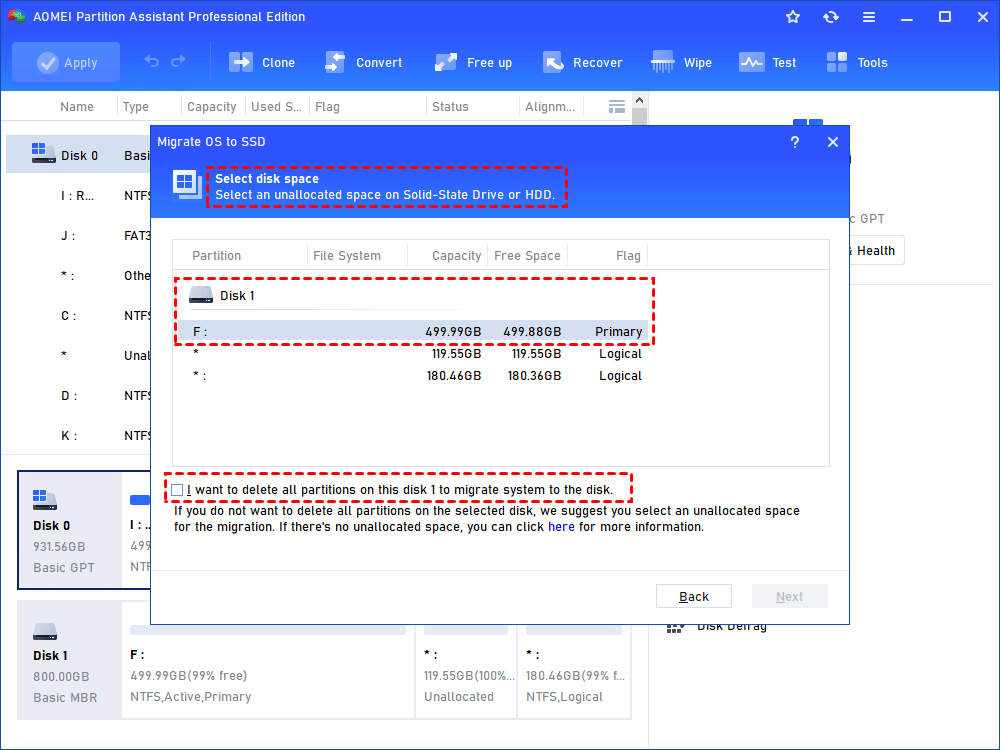
PS.: If there is no unallocated space, check “I want to deleted all…”, which will delete all partition on the target disk and cause data loss. Step 3. Here you can resize the partition being created on the new hard drive and then click “Next”.
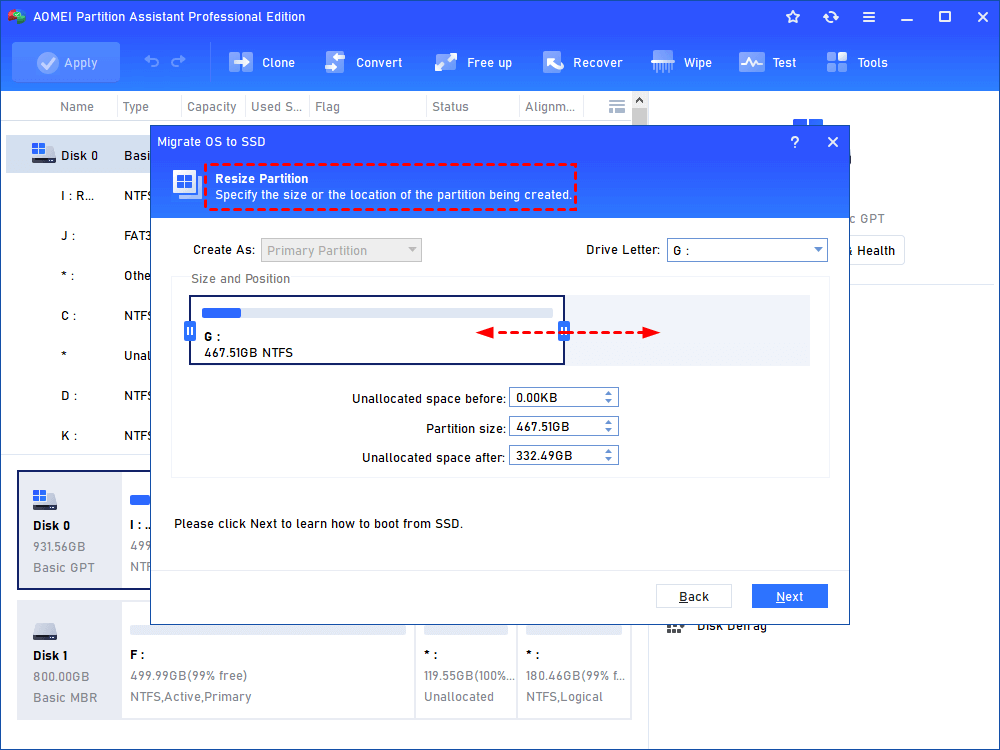
Step 4. Keep the note about how to boot OS in mind and click “Finish”.
Step 5. You’ll get back to the main interface; click “Apply” to commit the pending operation.

Notes:
-
This software can work with Windows 10, 8, 7, XP, and Vista. It is featured with many other charming functions, like recovering lost partition, rebuilding MBR, etc.
-
To install this app on an unlimited number of computers within one company to save money, you can try AOMEI Partition Assistant Unlimited.
- Share CrocoBlock key trọn đời Download Crocoblock Free
- Cung cấp tài khoản nghe nhạc đỉnh cao Tidal Hifi – chất lượng âm thanh Master cho anh em mê nhạc.
- Tự học lập trình trên điện thoại cực đơn giản với SoloLearn
- Kickass Torrents bất ngờ hồi sinh khiến "kẻ khóc người cười"
- Giá Dây Cáp Mạng Lan Internet Mới Nhất 2021 [Giá Chi Tiết]
- Ứng dụng live 18 – Live stream gái xinh – ứng dụng livestream 18 trực tiếp – friend.com.vn
- Hack Hải Tặc Đại Chiến 2021 ❤️ Hack Kim Cương, Tặng Acc
Bài viết cùng chủ đề:
-
Tổng hợp những ứng dụng kiểm tra mã vạch chính xác nhất cho iPhone
-
Hướng dẫn đăng ký bán hàng trên Now – Foody nhanh nhất
-
Cách chuyển dữ liệu từ máy tính sang Android – Download.vn
-
Tổng hợp khuyến mãi dung lượng Viettel – Data 4G Viettel cập nhật nhanh nhất – Khuyến mãi – Thuvienmuasam.com
-
Cách chuyển Google Chrome sang tiếng Việt – QuanTriMang.com
-
Nên mua iphone 6 plus hay 6s plus? – SOshop
-
7 cách tắt màn hình laptop Windows 10 – QuanTriMang.com
-
Cách gõ tiếng Việt có dấu bằng kiểu VNI, Telex trên điện thoại Android – Thegioididong.com
-
Cách chơi Vainglory trên PC bằng giả lập android BlueStacks
-
Cảnh nóng gây sốc bị chỉ trích nặng nề nhất trong phim gây nghẽn sóng HBO
-
Hướng dẫn biến thẻ nhớ thành bộ nhớ trong cho điện thoại Android – Fptshop.com.vn
-
Need for Speed: Hot Pursuit PC Free Download Full Version – Gaming Beasts
-
Tăng Follow Instagram Miễn Phí 2021 ❤️ Cách Free Hay Nhất
-
3 cách làm ông già Noel bằng giấy cực đơn giản – QuanTriMang.com
-
Cách cài Kali Linux trên VMware cực dễ, có GUI – QuanTriMang.com
-
Lỗi BlueStacks màn hình đen, fix lỗi màn hình đen trong Bluestacks, gi


