FIX: Some settings are managed by your organization
Deprecated: trim(): Passing null to parameter #1 ($string) of type string is deprecated in /home/caocap/public_html/wp-content/plugins/fixed-toc/frontend/html/class-dom.php on line 98

With Windows 10 we got all sorts of new features and settings, but there are certain issues sometimes.
According to some users, they get Some settings are managed by your organization message when they are trying to change their settings.
But there are a few solutions available that can help you to resolve this problem and restore everything to normal.
Some settings are managed by your organization message can appear while trying to change certain settings. Speaking of this problem, users reported the following issues:
- Some settings are managed by your organization lock screen Windows 10 – This message can appear while you’re on the lock screen. To fix this problem, be sure to try some of our solutions.
- Some settings are hidden or managed by your organization Windows Update – Several users reported this message while trying to use Windows Update. To fix the problem, try modifying your registry and check if that helps.
- Some settings are managed by your organization Windows Defender – Sometimes this issue can appear while using Windows Defender. To fix the problem, you might want to try installing a third-party antivirus.
- Some settings are managed by your organization fingerprint, Windows Hello – This message can also appear while trying to add your fingerprint or when using Windows Hello. To fix that problem, you might have to change your group policy.
- Some settings are managed by your organization time – Several users reported this message while trying to adjust the time or date. In most cases, this message is harmless, and you can ignore it.
- Some settings are managed by your system administrator – This is a variation of this message, and if you encounter it, try changing your settings using the administrator account.
How can I fix Some settings are managed by your organization?
1. Remove work or school accounts
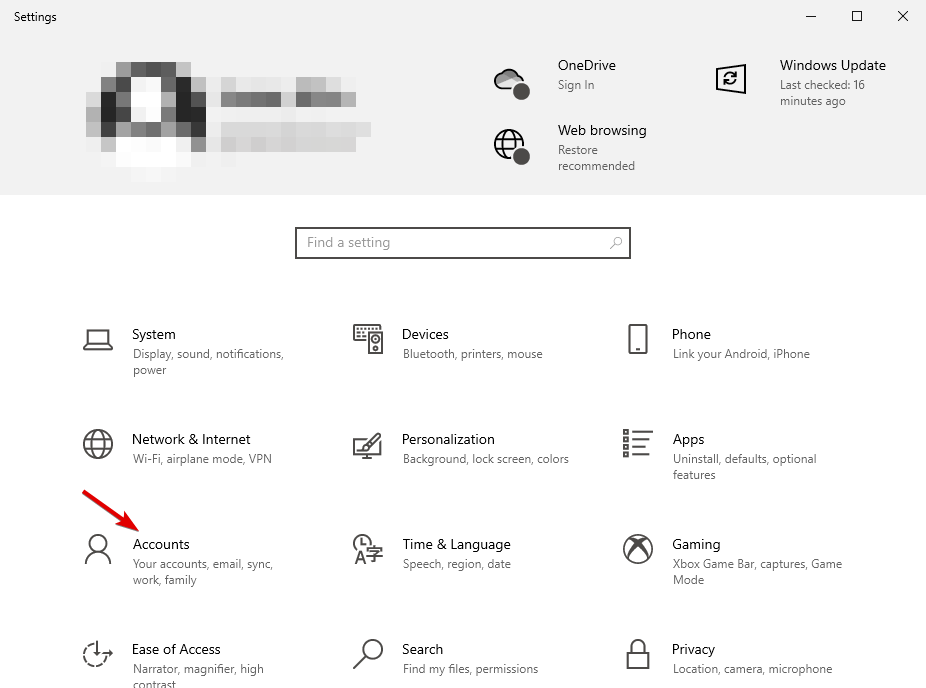
- Go to the Windows Settings.
- Click on Accounts.

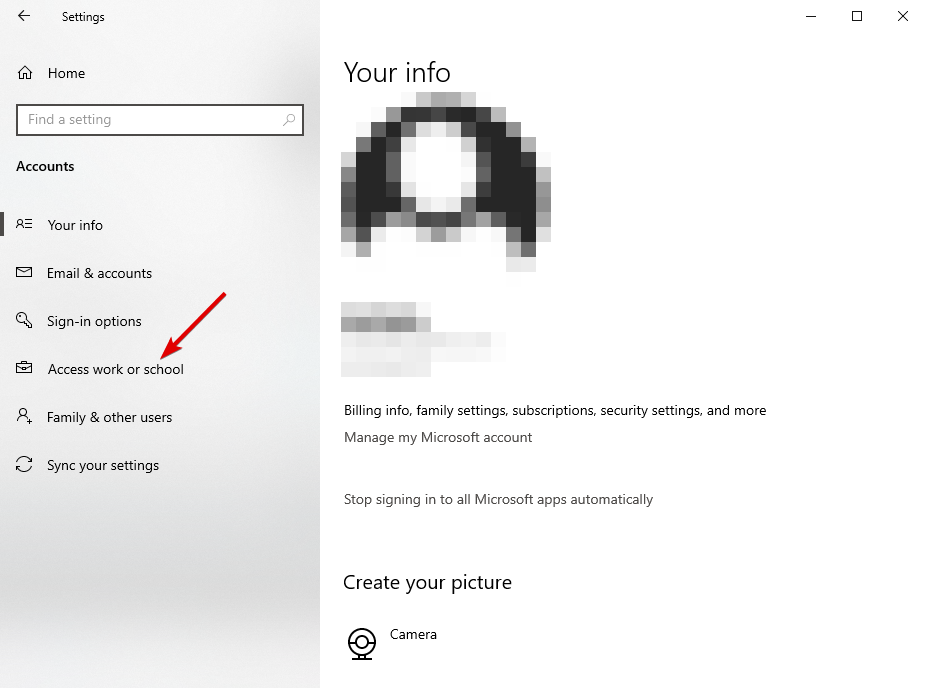
- Go to Access work or school.

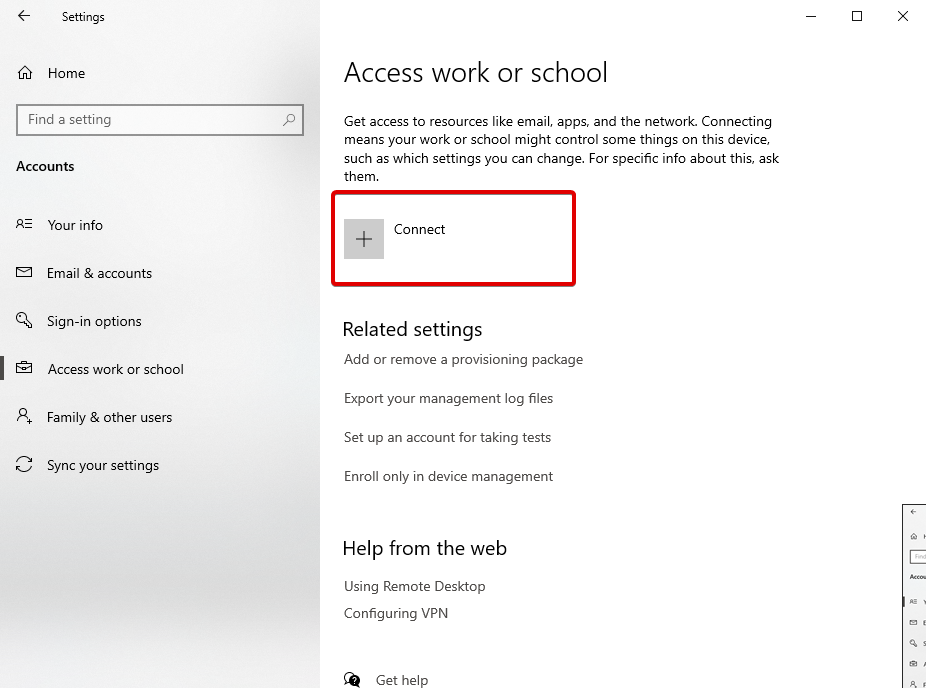
- Select any connected account and remove it.

- Restart your device.
Errors such as Your school manages your PCor Your organisation manages your PC usually happen when you have connected work or school accounts to the device.
Because of these accounts, you need permission from the company/school to make changes to your computer.
Additionally, this problem also occurs when you are trying to use the Windows Update Checker tool to see if you can upgrade to Windows 11.
Simply removing those accounts will get rid of the issues. Take a look at this thorough article dedicated to installing Windows 11 and learn how to do it properly.
However, the option to remove these accounts might not be available. If you can’t remove them, you can create a new user account with administrator privileges:
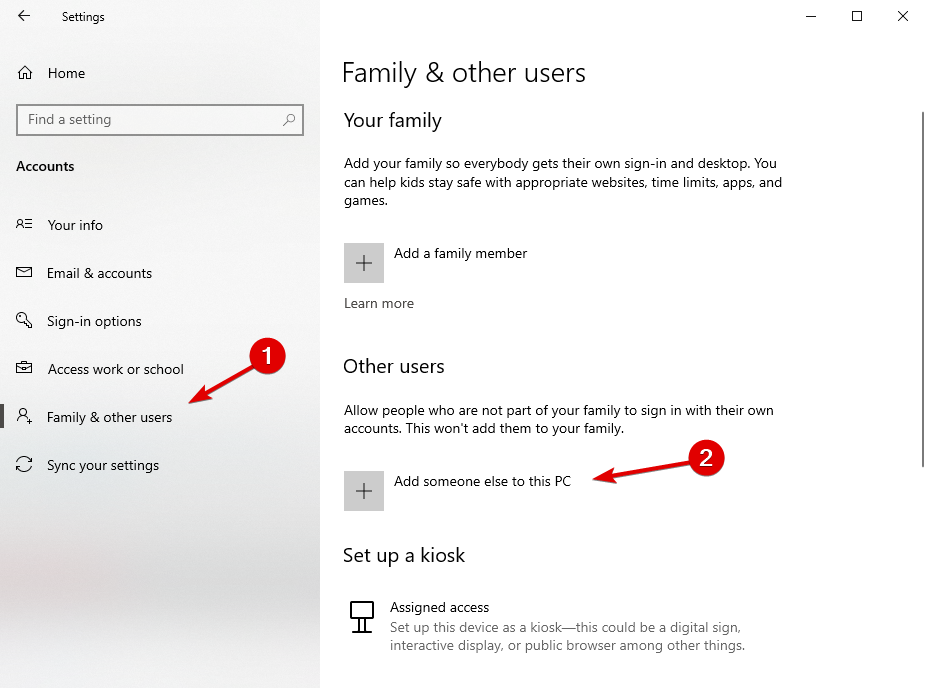
- Go to Settings.
- Then, Accounts.
- Select Family & other users.

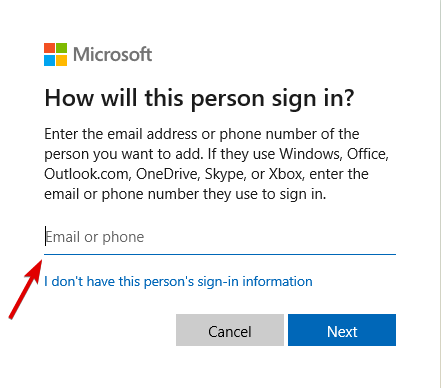
- Next, choose Add someone else to this PC.

- Enter the credentials in the box and follow the guidelines.
- After creating the account, change it to Administrator and click Okay.
If you are still having some issues with the installation process, check out this guide dedicated to fixing Windows 11 installation issues. It will come in handy when trying to upgrade your OS.
2. Change your Diagnostic and usage data
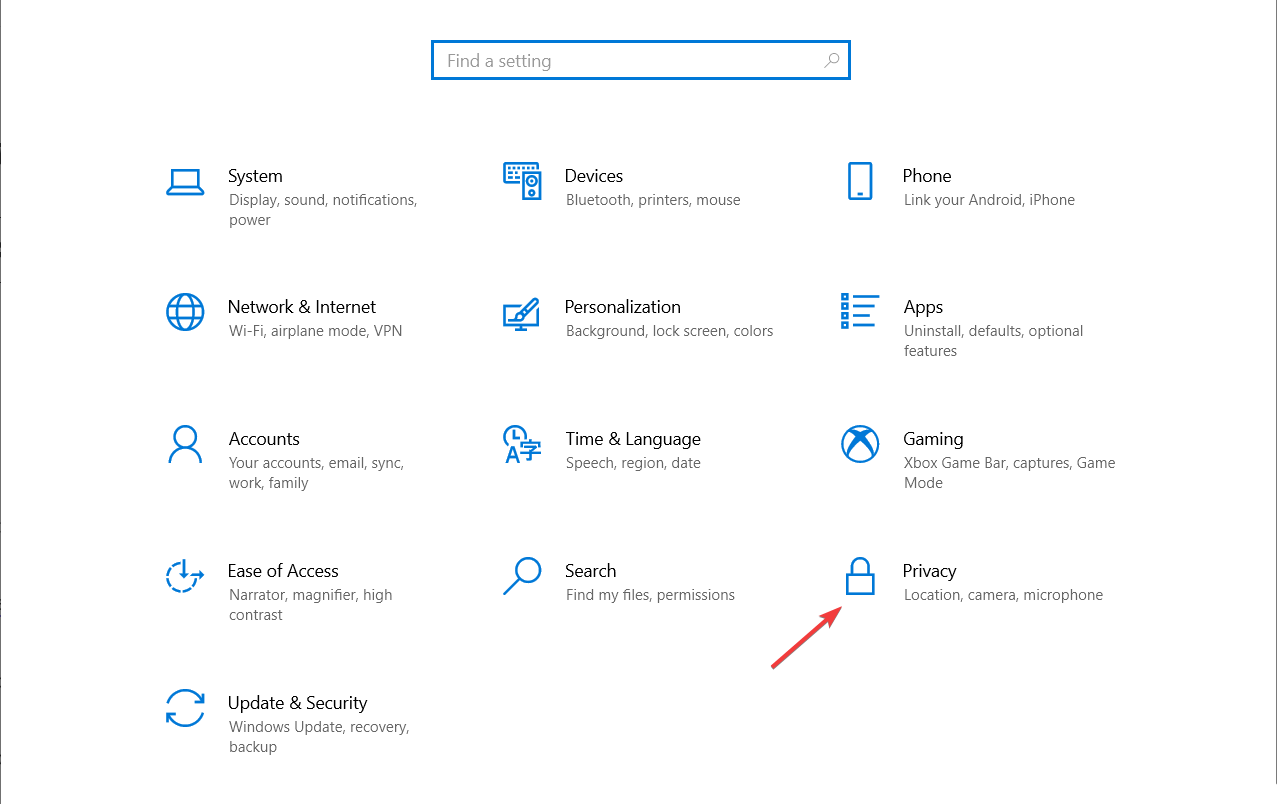
- Open Settings and select Privacy.

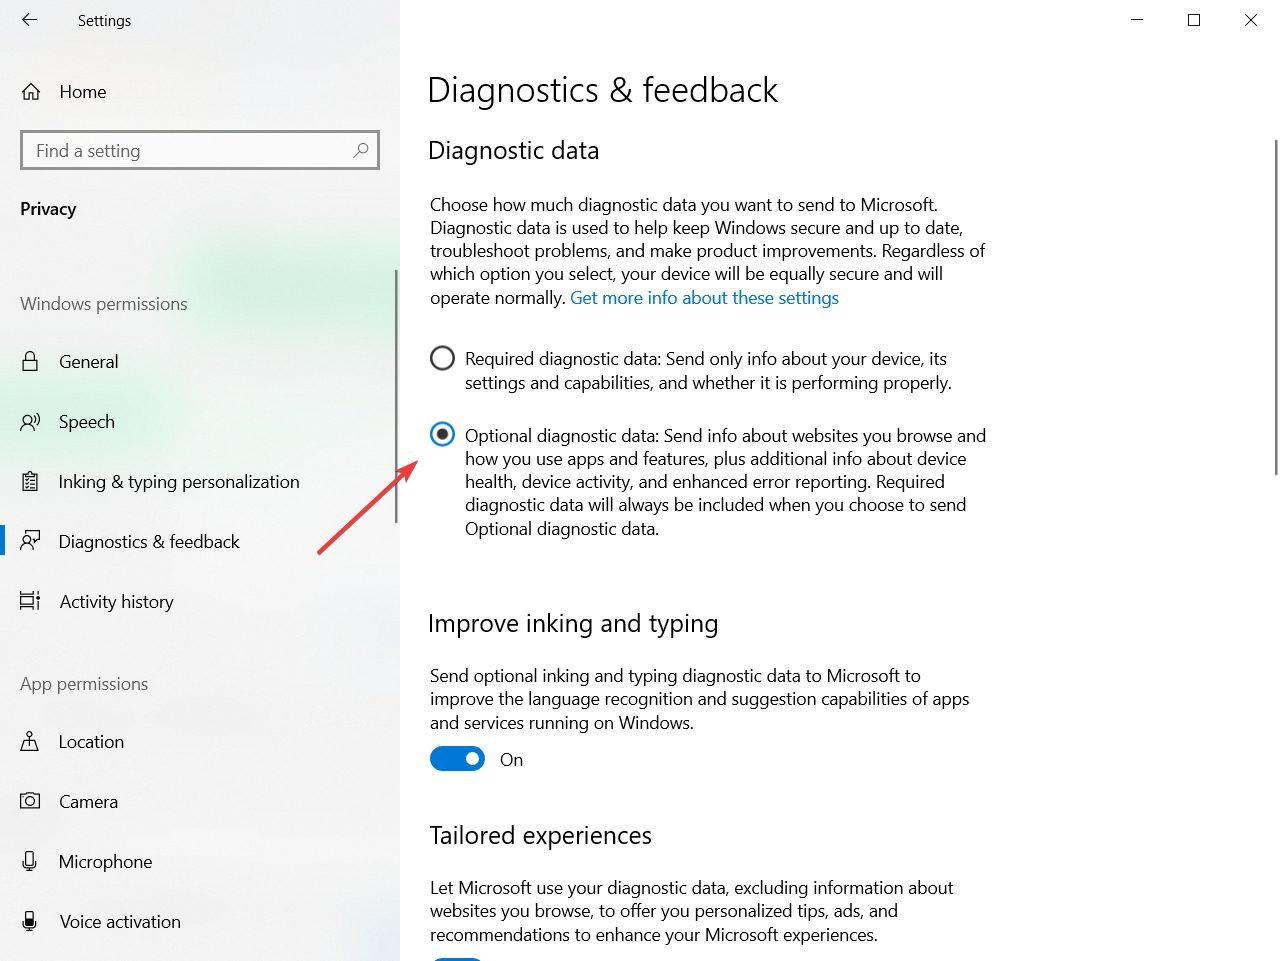
- On the menu on the left choose Diagnostics & feedback.

- From the right pane, change the Diagnostic data to Optional.

This solution is pretty simple, you just need to change one setting. We have to mention that this option regulates how much of your personal data is being sent to Microsoft for analysis.
If you’re not compatible with sharing too much of your personal data for analysis and bug fixing you should probably stick to Enhanced option.
Although this solution is pretty straightforward it doesn’t always work, but luckily, we have one more solution for you.
If you’re having trouble opening the Setting app, take a look at this expert article to solve the issue quickly.
4. Change your settings from Group Policy Editor
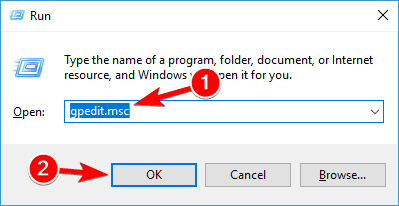
- Open Group Policy Editor by pressing Windows Key + R and typing friend.com.vn.

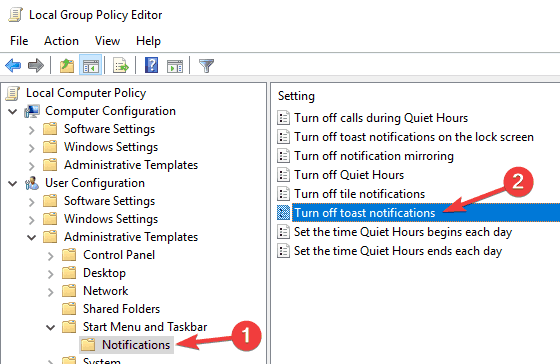
- When Group Policy Editor starts you need to navigate to: User Configuration/Administrative Templates/Start Menu and Taskbar/Notifications
- On the right side of the window find Turn off toast notifications setting and double click it.

- Try enabling it and disabling it a couple of times but remember to keep it disabled before you save your settings.
If you don’t know how to edit the Group Policy, check out this step-by-step guide, and find out how you can do it like an expert.
5. Edit your registry
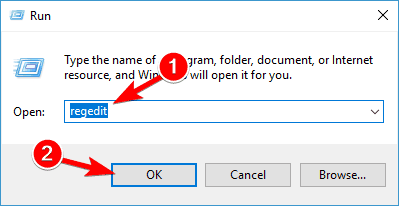
- Press Windows Key + R and enter regedit.
- Now press Enter or click OK. Registry Editor will now start.

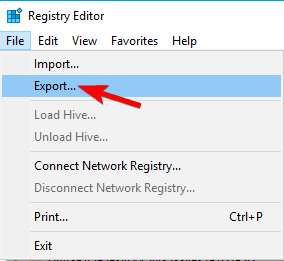
- Before we make any changes, it’s recommended to export your registry. The registry is sensitive to changes, and sometimes new issues can appear if you modify your registry, therefore it’s a good idea to create a backup. To do that, follow these steps:
- Click on File and selectExport.

- Now select All as Export range and enter the desired name. Choose a save location and click the Save button.

- Once you do that, you’ll create a backup of your registry. You can use this file at any time in order to restore your registry to its original state if anything goes wrong.
- Click on File and selectExport.
- In the left panel, navigate to the following key: HKEY_LOCAL_MACHINE/SOFTWARE/Policies/Microsoft/Windows/WindowsUpdate
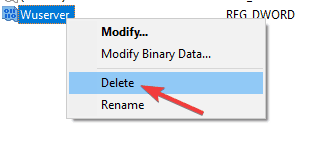
- In the right pane, look for Wuserver.
- Right-click Wuserver and choose Delete from the menu.

- A confirmation dialog will now appear. Click Yes to remove this entry.

According to users, Some settings are managed by your organization message that can appear due to your registry.
Certain registry values can interfere with your operating system and cause this and other errors to appear.
To fix the problem, you’ll need to manually modify your registry. Modifying the registry is relatively simple, and you can do it by following the steps above.
After making changes to the registry, the issue should be resolved. If you can’t find the key from Step 3 or the Wuserver DWORD, this solution won’t apply to you so you can skip it.
If you want to learn how to edit your registry like a pro, read this useful article and you will get more complex information.
6. Check your antivirus
According to users, sometimes Some settings are managed by your organization message can appear due to problems with your antivirus.
Many antivirus tools can interfere with your system and cause this message to appear.
To fix the problem, it’s advised to check your antivirus configuration and disable features that might interfere with Windows.
If that doesn’t help, you can also try disabling your antivirus completely. Even if you disable your antivirus, Windows Defender will start automatically and keep your PC safe from online threats.
If disabling the antivirus doesn’t help, you might have to uninstall it. The best way to do that is to use a dedicated removal tool from the antivirus manufacturer.
Here are a few uninstallers that will help you with some of the antiviruses:
- For Norton antivirus
- For McAffe antivirus
If you’re using any antivirus solution and you want to completely remove it from your PC, be sure to check out this amazing list with the best uninstaller software you can use right now.
Many antivirus companies offer dedicated removal tools for their software, so be sure to use one to remove your antivirus.
If removing the antivirus solves the issue, you should consider switching to different security software.
7. Enable Telemetry
6.1 Change the Registry key
- Open Registry Editor and create a backup of your registry. We showed you in detail how to do that in Solution 4.
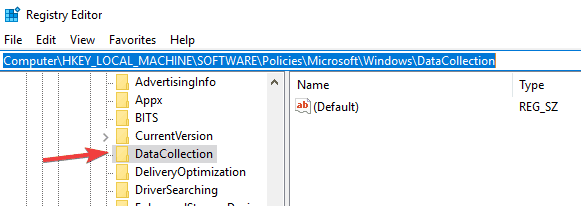
- When Registry Editor opens, in the left pane navigate to the following key: Computer/HKEY_LOCAL_MACHINE/SOFTWARE/Policies/Microsoft/WindowsDataCollection
- In the right pane, locate AllowTelemetry DWORD and set it to 1. If this DWORD isn’t available, you’ll have to create it manually and change its Value data to 1.

If you’re getting Some settings are managed by your organization message, you might be able to fix the problem simply by enabling Telemetry. To do that, just follow the steps above.
6.2 Enable the Telemetry service
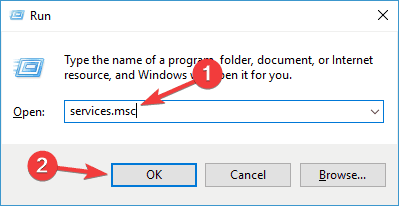
- Press Windows Key + R and enter friend.com.vn. Press Enter or click OK.

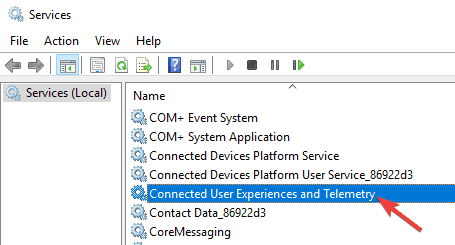
- When the Services window opens, double click on Connected User Experiences and Telemetry.

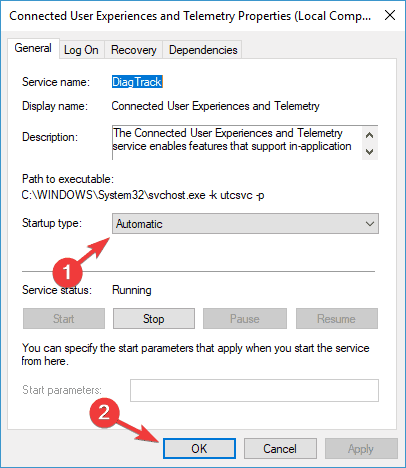
- Set the Startup type to Automatic and click on Apply and OK to save the changes.

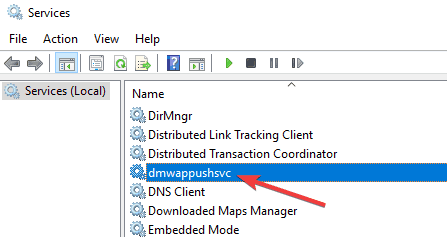
- Now locate dmwappushsvc and double-click it.
- Set the Startup Type to Automatic and make sure that the service is running.

After making the changes, you need to enable the Telemetry service. To do that, just follow the steps above. After doing that, check if the problem is resolved.
8. Check the scheduled tasks
- Press Windows Key + S and enter task scheduler. Select Task Scheduler from the list of results.

- When Task Scheduler starts, in the left pane, expand Safer-Networking directory and select Spybot Anti-Beacon. In the right panel, select the available task, right-click it and choose Delete.
Sometimes, scheduled tasks can interfere with Windows and cause Some settings are managed by your organization message to appear.
To fix the problem, you need to remove any scheduled tasks related to Spy bot Anti-beacon. To do that, follow the steps above.
If you’re looking for an alternative to Task Scheduler, check out these awesome software tools that will help you schedule your task like a pro.
Lastly, you need to modify your host’s file. Keep in mind that the host’s file is locked for editing, and in order to edit it, we recommend checking our article on how to edit the host’s file.
After opening the hosts’ file, you need to delete all values between # Start of entries inserted by Spybot Anti-Beacon for Windows 10 and # End of entries inserted by Spybot Anti-Beacon for Windows 10.
After making these changes, restart your PC and check if the problem is resolved.
As you can see Some settings are managed by your organization message can be annoying a bit, but you can easily solve it by following the instructions above.
Users have reported that both solutions are helpful although the first solutions don’t work for all users. If the first solution isn’t working for you the second one will probably fix it.
If your device is managed by an organization, you might also be interested with the best corporate & small business VPN solutions.
For any other suggestions or questions, feel free to leave them in the comments section below and we will get back to you as soon as possible.
- Share CrocoBlock key trọn đời Download Crocoblock Free
- Cung cấp tài khoản nghe nhạc đỉnh cao Tidal Hifi – chất lượng âm thanh Master cho anh em mê nhạc.
- 400 – 450 triệu nên mua xe ô tô mới nào 2021?
- Thời Trang Format Sale | 70% OFF | Tháng 4/2022 | Vua Khuyến Mãi
- Kiểm tra số lần sạc pin ngay trên iPhone cực kỳ thuận tiện
- Shark Hưng là ai ? Có mấy vợ, tên thật là gì ? Kinh doanh cái gì ?
- Đam mê nhiếp ảnh không nên bỏ qua 39 trang web cung cấp kho ảnh miễn phí Nhiếp ảnh
Bài viết cùng chủ đề:
-
Sử dụng IIS để tạo Server ảo cho Website ASP .NET – Phuong Duong' s Place
-
Số dư tối thiểu trong thẻ ATM Vietcombank là bao nhiêu?
-
Cách chơi Truy Kích không giật lag, chơi Truy Kích mượt hơn
-
Realtek PCIe GBE Family Controller là gì? Cách khắc phục Realtek PCIe GBE Family Controller khi gặp sự cố
-
Diễn viên “Tân Tam Quốc” 2010: Người bị tẩy chay, kẻ biến mất khỏi showbiz
-
Printer | Máy in | Mua máy in | HP M404DN (W1A53A)
-
5 cách tra cứu, tìm tên và địa chỉ qua số điện thoại nhanh chóng
-
Công Cụ SEO Buzzsumo Là Gì? Cách Mua Tài Khoản Buzzsumo Giá Rẻ • AEDIGI
-
Cách giới hạn băng thông wifi trên router Tplink Totolink Tenda
-
Sự Thật Kinh Sợ Về Chiếc Vòng Ximen
-
Nên sử dụng bản Windows 10 nào? Home/Pro/Enter hay Edu
-
"Kích hoạt nhanh tay – Mê say nhận quà" cùng ứng dụng Agribank E-Mobile Banking
-
Cách gõ tiếng Việt trong ProShow Producer – Download.vn
-
Câu điều kiện trong câu tường thuật
-
Phân biệt các loại vạch kẻ đường và ý nghĩa của chúng để tránh bị phạt oan | anycar.vn
-
Gỡ bỏ các ứng dụng tự khởi động cùng Windows 7

