How to Fix Error 1053: The Service did not Respond to the Start or Control Request in a Timely Fashion? – Appuals.com

Th11
Deprecated: trim(): Passing null to parameter #1 ($string) of type string is deprecated in /home/caocap/public_html/wp-content/plugins/fixed-toc/frontend/html/class-dom.php on line 98
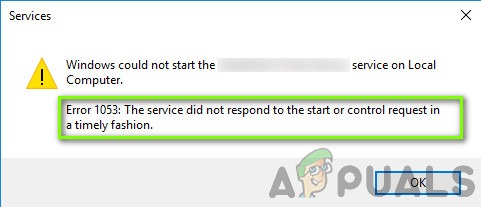
Users experience the error message 1053 which states ‘The service did not respond to the start or control request in a timely fashion’. This error message is the cause of a timeout that occurs after a request was initiated to start a service but it did not respond in the time window.
There are numerous variations of the error message ranging from issues in Windows services to custom services not being able to launch (including games and other third-party software). We also came across instances where Developers faced this problem when they were developing their custom software. Here in this article, we will go through all the variations of the error message and discuss what could be done to solve the problem once and for all.
What causes Error 1053 in Windows?
After receiving initial reports from users, we started our investigation and took a deep look at all the modules involved in the mechanics of starting as service. After gathering all the results and syncing them with user responses, we concluded that the issue occurred due to several different reasons. Some of them are listed below:
Before we move on with the solutions, make sure that you are logged in as an administrator on your computer and have an active internet connection. Also, follow the solution from the start and work your way down accordingly.
Solution 1: Changing Timeout Settings through Registry
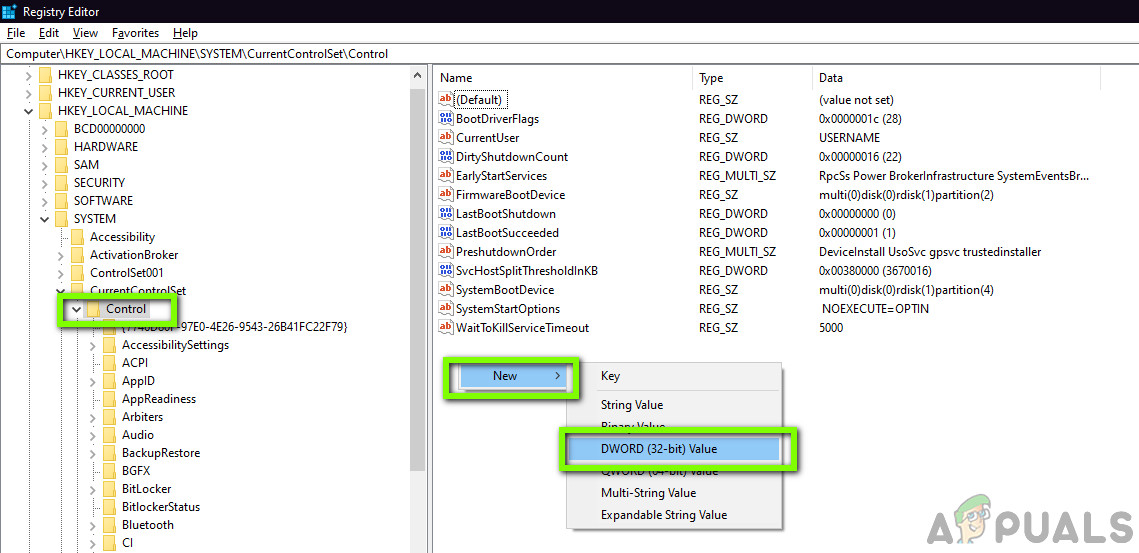
The very first thing which we should try is changing the timeout settings of your services through your registry editor. Whenever a service is requested to launch, a timer is started with a predefined value. If the service doesn’t start within this time frame, the error message comes forward reporting so. Here in this solution, we will navigate to your computer’s registry and change the value. If it isn’t present, we will create a new key for it.
- Press Windows + R, type “regedit” in the dialogue box and press Enter.
- Once in the registry editor, navigate to the following file path:
HKEY_LOCAL_MACHINESYSTEMCurrentControlSetControl
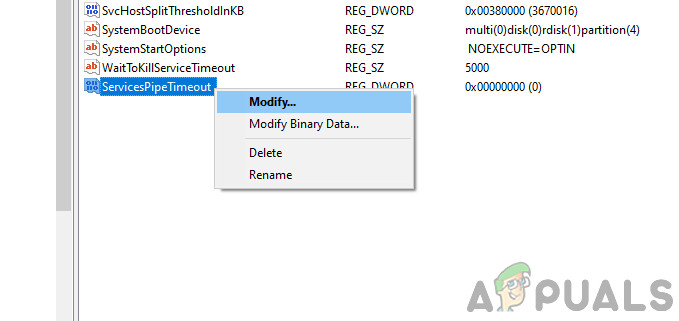
- Now, search for the key of ‘ServicesPipeTimeout’. If you find it already there, you can move to directly edit. However, if you don’t find the entry, select Control, right-click on any space present at the right side of the screen and select New > DWORD

Creating a new Registry Key - Name the key as ‘ServicesPipeTimeout’ and set the value as 180000 (You can also right-click the value and click Modify if the option to set the value didn’t come in your case.
Changing ‘ServicesPipeTimeout’ value - Save changes and exit. Restart your computer completely and then try launching the service. Check if the issue is resolved.
Solution 2: Checking for System File Corruptions
Another thing to try before we move on to more technical and advanced methods is checking whether the system has any corruption or not. If your very Windows is missing files and is somehow corrupt, it may cause some important modules not to work. As a result, you will experience the error message 1053. In this solution, we will use Window’s system file checker which checks all your system file structure and compares the structure with that of a fresh copy present online. If there is any discrepancy, the files will be replaced accordingly.
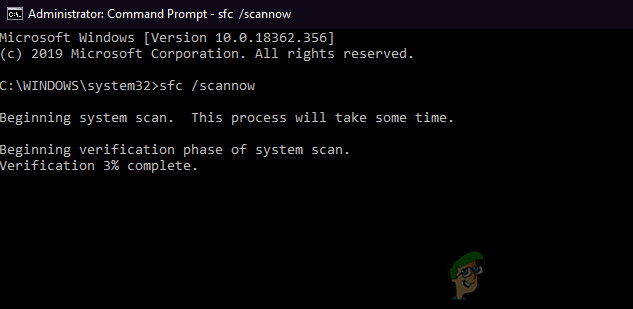
- Press Windows + S, type “command prompt” in the dialogue box, right-click on the application and select Run as administrator.
- Once in an elevated command prompt, execute the following commands one by one and make sure that they complete:
sfc /scannow DISM /Online /Cleanup-Image /RestoreHealth
- The latter command fixes any issues which the system file checker diagnoses when running the scan. Restart your computer completely after running the commands and check if the issue is resolved for good.
Solution 3: Reinstalling the application (if applicable)
Another useful method to eradicate the error message 1053 is reinstalling the application which is requesting the service. Normally, third-party applications installed from an outside source (excluding Microsoft Store) might have missing or outdated components that are requesting for some service in Windows.
Here, what you can do is navigating to the official website and downloading a fresh version of the application. After uninstalling the current version, you can install it. Here is the method on how to uninstall an application in Windows.
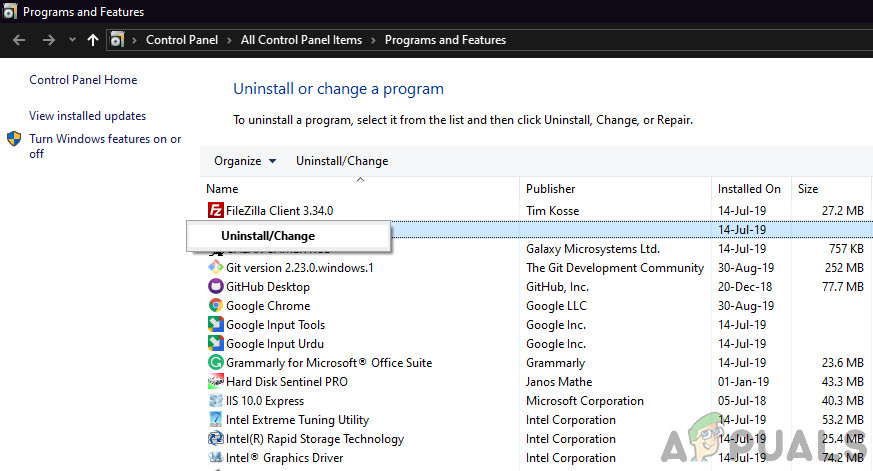
- Press Windows + R, type “appwiz.cpl” in the dialogue box and press Enter.
- Once in the application manager, search for the application, right-click on it and select Uninstall.
Uninstalling the Application - Restart your computer and then proceed with the reinstallation process.
Solution 4: Resetting Network Cache and Configurations
If you are using a service that connects to the internet and gets some work done over there, it is recommended that you check whether all your sockets and other network configurations are intact and not causing any problems. If they are, your service might not be able to connect to the internet to carry out its tasks and hence cause difficulties.
In this solution, we will navigate to the command prompt as an administrator and reset the network configurations from there. If successful, the error message will be eradicated.
Note: This will erase all the custom settings which you have set manually.
- Press Windows + R, type “command prompt” in the dialogue box, right-click on the application and select “Run as administrator”.
- Once in an elevated command prompt, execute the following commands one by one:
netsh winsock reset ipconfig /renew
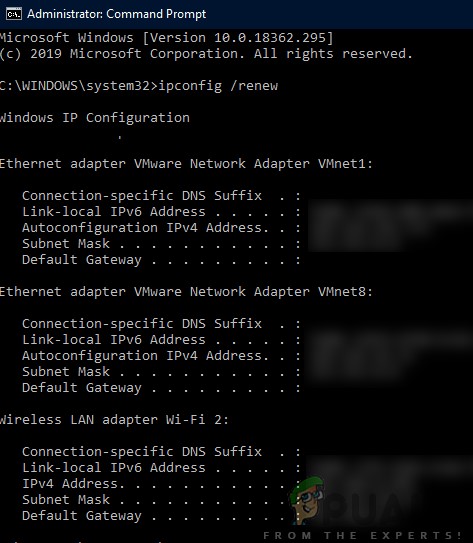
- After resetting your network, make sure that you have internet access by checking through your browser and see if the issue is resolved.
Solution 5: Getting Ownership of the Application
Another rare case that we came across was not having the ownership of the application caused the application not to execute the service properly. This makes sense as if the application doesn’t have enough elevated access, it will not be able to send/read the response to/from a service (especially if it is a system service). In this article, we will navigate to the executable of the application and then change the ownership to our username. If successful, this will solve the problem of getting the error 1053.
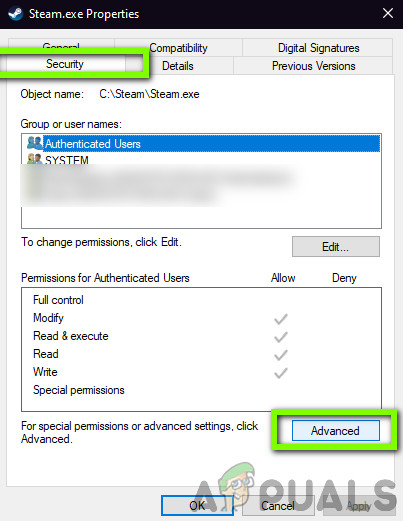
- Locate the file/folder of the application. Right-click and select Properties.
- Navigate to the “Security” tab and click on “Advanced” present at the near bottom of the screen as you can see in the image below.
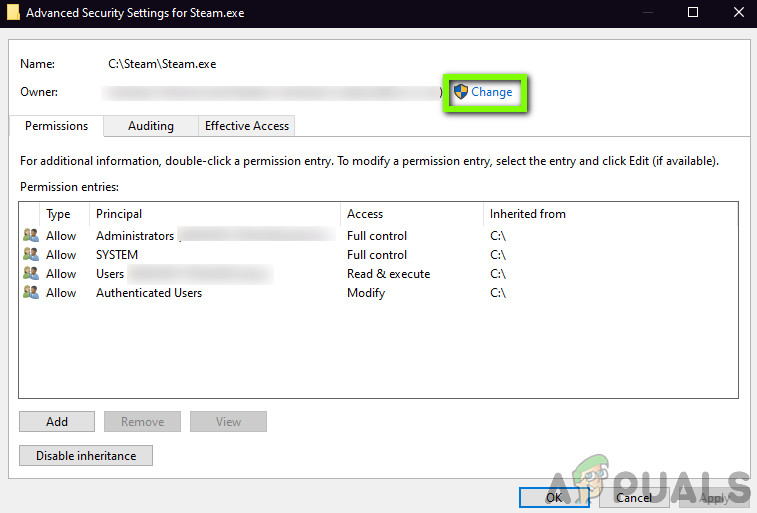
Advanced Security Settings - Click on the “Change” button present in the preceding screen. It will be right in front of the owner’s value. Here we will change the owner of this folder from the default value to your computer account.
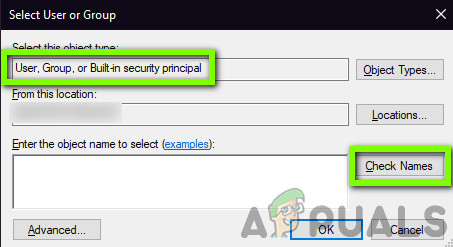
Changing Owner of application - Now enter your user account name in the space present and click on “Check Names”. Windows will automatically list all the accounts which are a hit against this name.
Checking for Viable Names
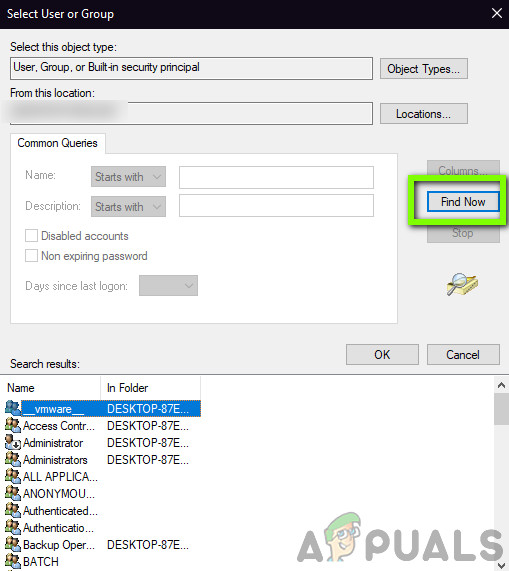
If you can’t find your account name using this method, you can try selecting it manually from the list of user groups available. Click on “Advanced” and when the new window comes forth, click on “Find Now”. A list will be populated at the bottom of the screen consisting of all the user groups on your computer. Select your account and press “OK”. When you are back at the smaller window, press “OK” again.
- Now check the line “Replace owner on sub containers and objects”. This will ensure that all the folders/files within the folder also change their ownership. This way you won’t have to proceed with all the processes again and again for any sub-directories present. In addition to this, we also recommend that you enable the option “Replace all child object permission entries with inheritable permission entries from this object”.
- Now close the Properties window after clicking “Apply” and open it again afterward. Navigate to the security tab and click “Advanced”.
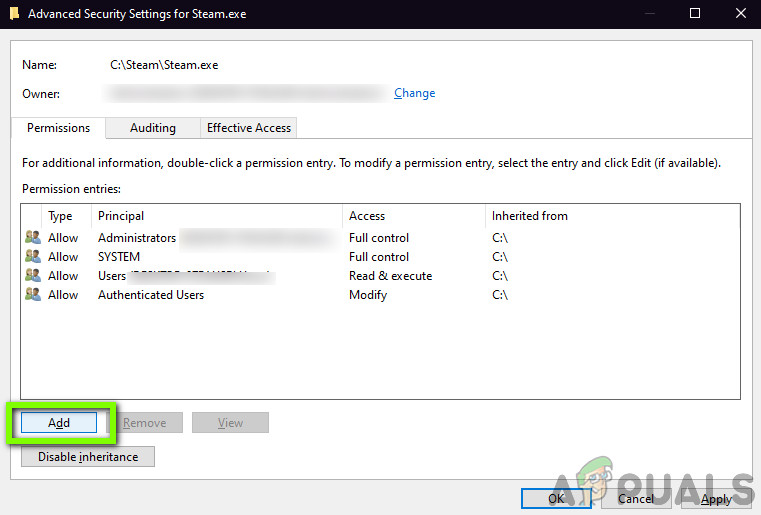
- On the permissions window, click on “Add” present at the near bottom of the screen.
Adder user account to elevated status - Click on “Select principle”. A similar window will pop up like it did in step 4. Repeat step 4 when it does. Now check all the permission (giving full control) and press “OK”.
- Check the line “Replace all child object permission entries with inheritable permission entries from this object” and press Apply.
- Close the files and restart your computer completely. Now, try launching the application and check if the issue is resolved for good.
Solution 6: Updating Windows to the Latest Build
Another thing to try is checking whether you have the updated version of Windows installed on your computer or not. Microsoft release updates to target new changes in the OS and to support additional features as well. Some updates are ‘critical’ in nature and must be installed as soon as possible. If any of these ‘critical’ updates are not installed, you will experience issues.
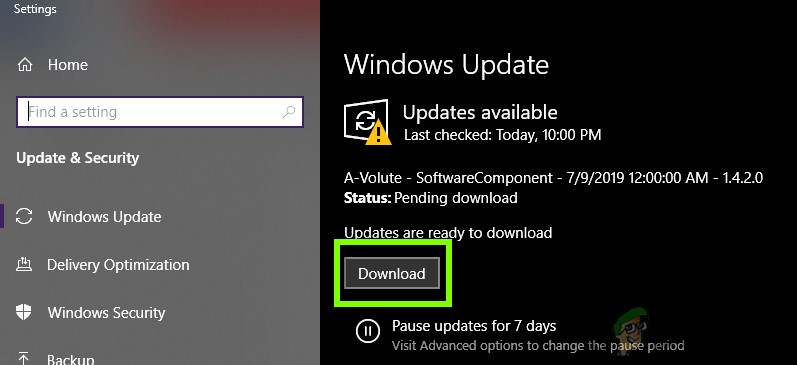
- Press Windows + S to launch the search bar, write Update in the dialogue box and open the Update settings.
Checking for updates - Once in the update settings, click on Check for updates. The computer will now connect to Microsoft servers and see if there is any update available. If there are any updates already highlighted, perform them immediately.
Bonus: Tips for Developers
If you are a developer and are trying to launch a service in Windows, there are hundreds of technicalities that you should be doing accurate to spawn and get a response from service. Here in this bonus solution, we will list some of the most popular causes of Error 1053 in the developing world and their solutions.
- Share CrocoBlock key trọn đời Download Crocoblock Free
- Cung cấp tài khoản nghe nhạc đỉnh cao Tidal Hifi – chất lượng âm thanh Master cho anh em mê nhạc.
- Vòng điều hòa huyết áp Nhật Bản EX Magnelood mẫu mới
- Bật Mí: Con Trai Thích Mặc Quần Lót Nữ Có Sao Không? – friend.com.vn
- Triệt lông bằng công nghệ Diode Laser – Phòng khám Da liễu Maia&Maia
- Các hiệu ứng đẹp trong Premiere không thể bỏ qua – Người làm Truyền hình
- Kinh Doanh Sữa Có Lời Không? 5 Bước Cần Lưu Ý Năm 2021
Bài viết cùng chủ đề:
-

Mã GTA bất tử, bản vice city, 3, 4, 5
-

Chơi game ẩn trên Google – QuanTriMang.com
-

Gợi ý 8 phần mềm hiện file ẩn trong USB miễn phí tốt nhất – Fptshop.com.vn
-

Top 100 Pokemon mạnh nhất từ trước đến nay mọi thế hệ – nShop – Game Store powered by NintendoVN
-

Tải ảnh từ iCloud về iPhone bằng 3 cách đơn giản – Fptshop.com.vn
-

Hướng dẫn sử dụng iphone 4s cho người mới dùng toàn tập
-

Get Mass Video Blaster Pro 2.76 Full Modules Cracked Free Download
-
Vẽ đường cong trong cad, cách vẽ đường cong lượn sóng trong autocad
-

Hướng dẫn tạo profile Google Chrome từ A đến Z – Vi Tính Cường Phát
-

Cách tạo ghi chú trên màn hình desktop Windows 10 cực đơn giản – Thegioididong.com
-
Hữu Lộc tử nạn vì đỡ cho con – VnExpress Giải trí
-

Cửa xếp nhựa giá rẻ dùng cho nhà vệ sinh, nhà tắm | Lắp đặt tận nơi – Thế Giới Cửa
-
Review top 4 máy bắn vít DCA nổi bật, chất lượng nhất
-
2 bước thực hiện cuộc gọi video trên Facebook – QuanTriMang.com
-
Dễ dàng sửa lỗi máy tính desktop và laptop không lên màn hình
-

Cách thu hồi, lấy lại tin nhắn SMS lỡ gửi nhầm trên iPhone, Android – Thegioididong.com


